Get in touch
+022-50965000
Dr. Choitram Gidwani Road,
Chembur, Bombay 400074
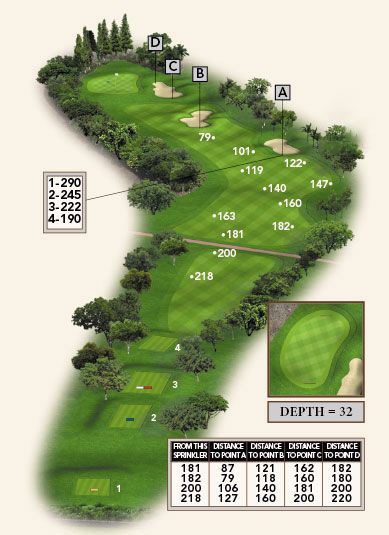
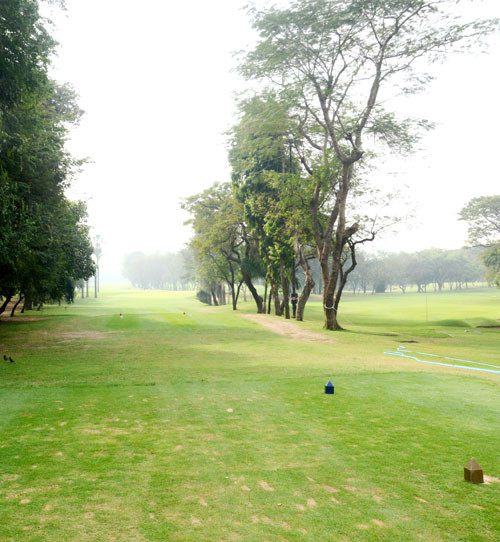
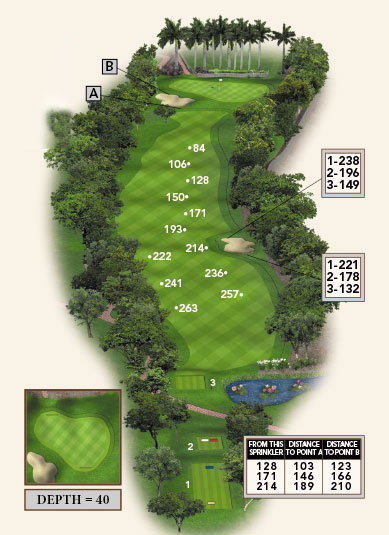
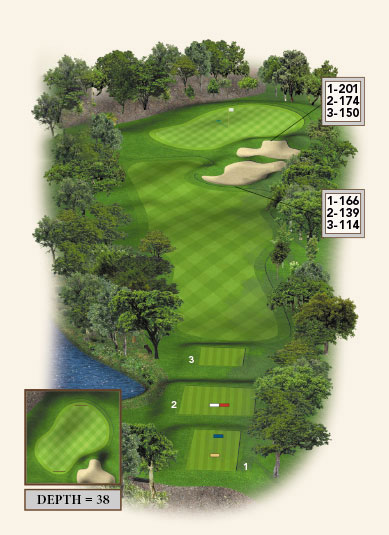
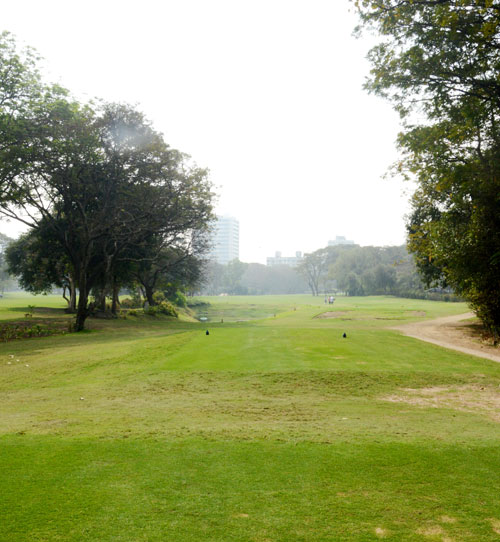
The 1st hole allows you to play yourself in. A longish drive with a draw is ideal. Aim at the twin palm trees on the right & you are then left with a wood, long iron or in some cases even a mid iron, to a not too tightly guarded green.
If you lay up, be wary of the bunkers on the right. There is a small hollow, short off the green on the right. A 2 putt on this relatively easy green is very much possible. A definite birdie hole opportunity for long hitters.
TIP: Preferable to be short of the green vs long.
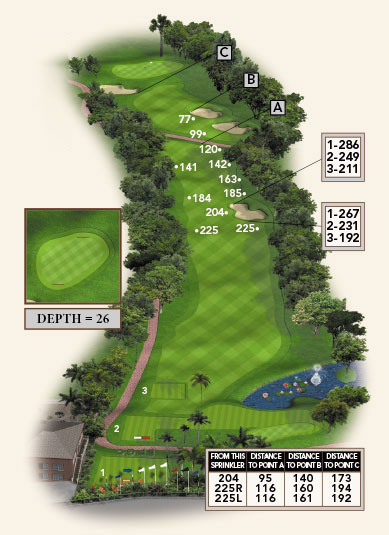
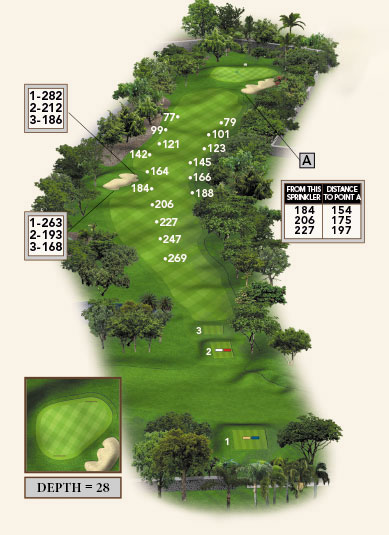
Do not let the index 11 figure lull you into believing this hole is easy. You tee off from a slightly elevated tee and club selection will be key what with crosswinds & head winds to factor for. The green is guarded by a bunker and you could be playing anything from 170 to 200 yards depending on the wind & hole position. The green is narrow so make sure your tee shot has enough elevation to hold the green.
TIP: Preferable to be long rather than short of the green.
A relatively simple driving hole as long as you can keep the ball straight since the fairway is narrow. Stay short of the ditch that runs across the fairway @ 263 yards from the tee. From here you have a short iron to a green that is quick and 2 tiered. Putting on this green can be tricky depending on the pin position. The green slopes severely from back to front.
TIP: Be conservative with your drive from the tee.
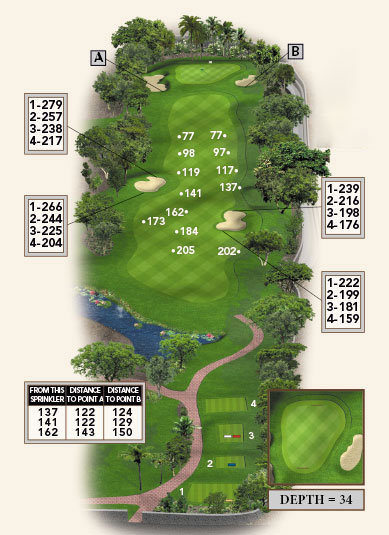
This is a challenging hole from the word go. A dog leg right with a hazard running all along the right. You want to be able to drive straight. anything from 220 to 260 yards will do. The 2nd shot has 2 large trees guarding the green & you will use a mid iron to get close to the green or a wood to get on. The green is banked & in some parts severely sloped from back & right to front.
TIP: Be short of the green rather than long.
From a slightly elevated green you have a wide fairway with a line of trees on the left and a OB on the right. This is a slight dogleg left hole. Premium here is placed on a straight drive. If you are long & left a tall tree comes into play. The green is guarded by bunkers on the left and right and the pin position can sometimes make this a tricky approach shot especially with cross winds. The green is deep & a back pin may mean a extra club. Be careful with your club selection on your approach shot. Very fast & a tricky green to putt on.
TIP: Don’t be long here as the green slopes away and down.


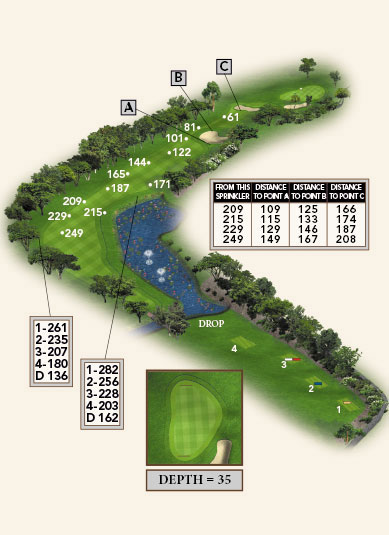
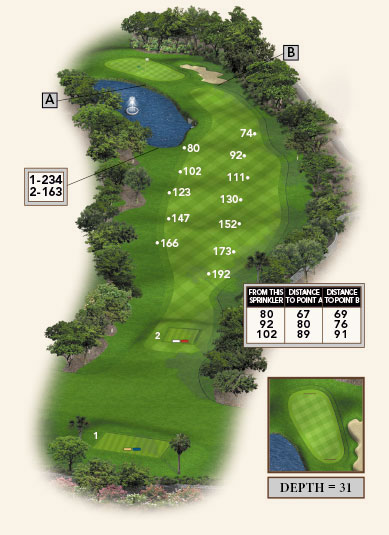
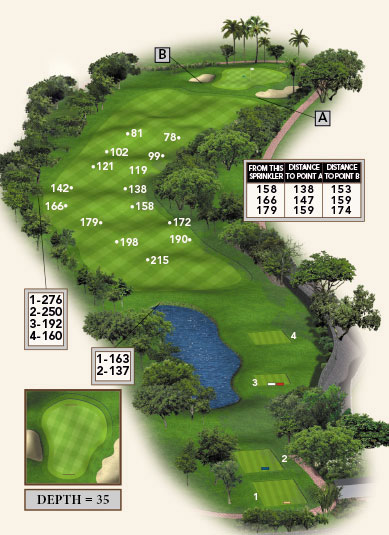
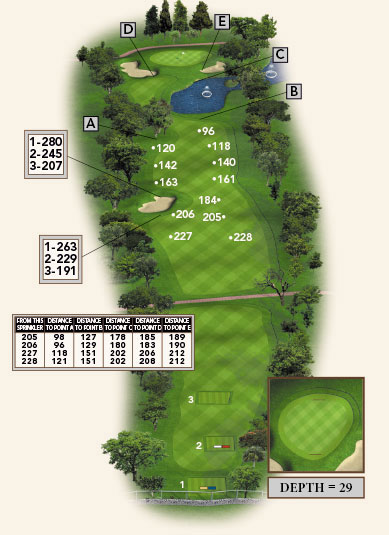
With the new design this hole can be challenging with the water body that runs along the left & the front of the green. The carry across the water from the Black tees is 170 yards. Crosswinds make club selection very critical. Do not make the mistake of being tentative on this hole as a firm shot is needed off the tee. Trees on the left guard the green and a bunker on the right waits for the errant shot. The green slopes from left to right and can play slow depending on how the grass is cut.
TIP: Make sure you factor for the wind correctly on this hole.
A dogleg left with trees bordering the fairway & trouble all along the left hand side. There is a fairway bunker at the dogleg on the right. The fairway turns a sharp left after 250 yards. The 2nd shot is to a green that has OB on the left & back. There is a a deep bunker guarding the right. The green is deep so you can be aggressive with attacking the pin. A challenging hole a Par here is a great score.
TIP: Don’t be long on this hole.
With the wind that can be in your face this hole can play anywhere from 170 to 210 yards. A very challenging par 3 with large undulations on the green it can be fast and tricky to read. Trees on the right provide a canopy of cover to the green so a fade is not the easiest of shots. A gentle slice is the perfect shot. Hit a well flighted shot as elevation is required to hold the ball on this green. Be wary of the bunker on the right edge of the green.
TIP: Don’t be long on this hole.
A very challenging hole where a par is to be treasured. The hole has a OB running on the right for the errant slice and trees on the left. A fade of the tee box will be a perfect shot to a reasonably wide fairway. The second shot is to a green that is guarded by a bunker on the left and that slopes from front to back. The lines on this green can be hard to read. There is a huge bailout area on the right of the green.
TIP: Be short rather than long.
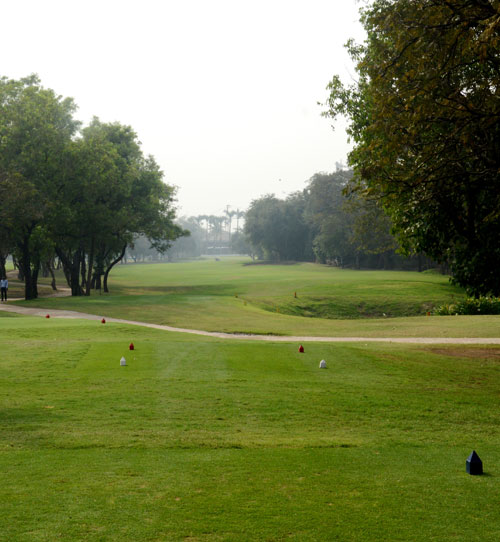
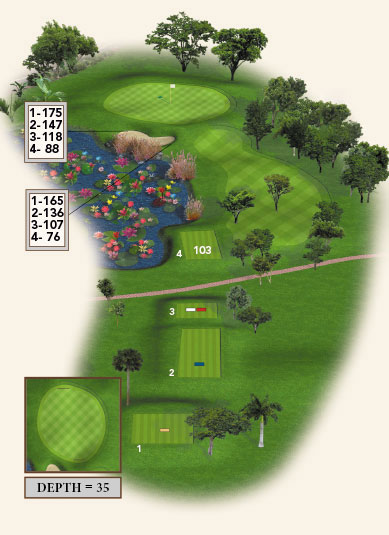
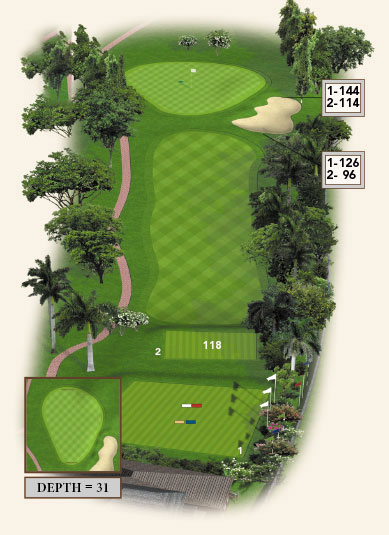
A simple straightforward par 3 that is definitely a birdie opportunity. A stretch of trees border the right, beyond which is an OB area. A bunker on the right of the green is positioned for the errant tee shot. The green is wide & deep with a few undulations. Hit a nice straight wedge to mid iron after factoring for the wind.
TIP: Don’t go right of the green under any circumstances.
This is the beginning of the more demanding part of the course – one in which percentage golf pays. A long drive taking care to avoid the bunker on the right side of the fairway leaves you with a medium to short Iron to a green that is sloped from back to front. The bunker on the right of the green makes for a difficult up & down since the green slopes away from you when playing from there.
TIP: Attack the green as it’s very large & deep.

You don’t need a driver on this hole. What you need is a very accurate drive to the right center of the fairway (200 yds will do). This will leave you with a 100 to 130 yard pitch to a deceptively fast and tight green. The right side of the fairway is a OB and the left has a large bunch of trees that you don’t want to be close to, as it makes the 2nd shot very difficult. Played conservatively a birdie hole.
TIP: Play safe to the center of the green.
A very difficult par 3. You would either need a long iron or a wood to get to the green. It slopes from right to left & is guarded by bunkers on either side to catch the errant shot. At the tee box, trees on the left will force you to go straight over the bunker or hit the ball from right to left over the bunkers again. The trees that line both sides of the fairway are a distraction that you need to try and ignore. A par on this hole is something to feel very good about. The beginning of a tough 3 hole stretch.
TIP: The green is wide so aim for the center.
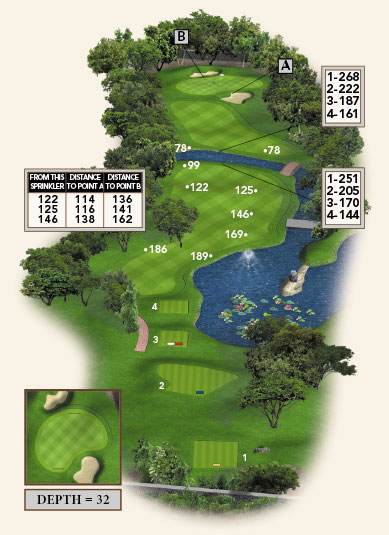
This is where the trauma begins, especially if you are playing from the Gold tees. Easily the toughest par 4 on the course, you need a long drive as this is a dogleg right with a large tree guarding the corner. You don’t want that tree hampering your second shot so keep your drive to the center / left center of the fairway. You then have a long iron / wood to get to the green that is guarded on the right by a bunker & that has trees on the left. The saving grace is the green is easy & you have a refreshment hut at the end of this hole to drown your sorrows.
TIP: Be short of the green as there is a steep slope if you go long.

The next in the par 4 trauma series. This is a long hole with a narrow fairway that needs a very accurate shot off the tee to the left of the fairway. That will ensure you are able to attack the green in 2. This is a dogleg right with a large bunch of tall trees bordering the center and right of the fairway along which runs a OB area. The green is narrow & is guarded on the left and right by bunkers that are deep and treacherous. The green is undulating and can be tricky.
TIP: Be short of the hole / green.
A tricky par 5 that lulls the long hitter into being adventurous. You need to be wary of all the distractions that this hole has in store for you. The 1st shot is to a wide and generous fairway but you don’t want to be close to the large tree on the right or the clump of bushes on the left. On the 2nd shot be wary of the cross winds that are not easy to judge. There is a small wall just short of the green beyond which is the OB. The green is deep and tricky, especially if the pin is at the front or back edge.
TIP: Be short of the green on the left to attack the pin.

The last of the par 3′s and the most challenging. You need a long, accurate long iron after factoring for the wind to a green that is very well guarded with a OB on the right and bunkers on both sides. The conservative approach is to be short & chip and putt. Leaving the ball way left does not make at all for a easy chip and putt. The green slopes away at the back and left and is a tricky one to read. Not your birdie hole for sure.
TIP: Be short of the green rather than long.
This will seem like a simple hole after the last 5. A shortish par 5 its easy to get to the green in 2 for long hitters. The rest of us need to hit a drive center / right center of the fairway. The 2nd /3rd shot is to a green that is guarded on the right by water that has a nasty reputation of nabbing errant shots. The green has undulations & slopes hard – putting here can be tricky.
TIP: Play short of the green on the left & then attack the pin.
![]()
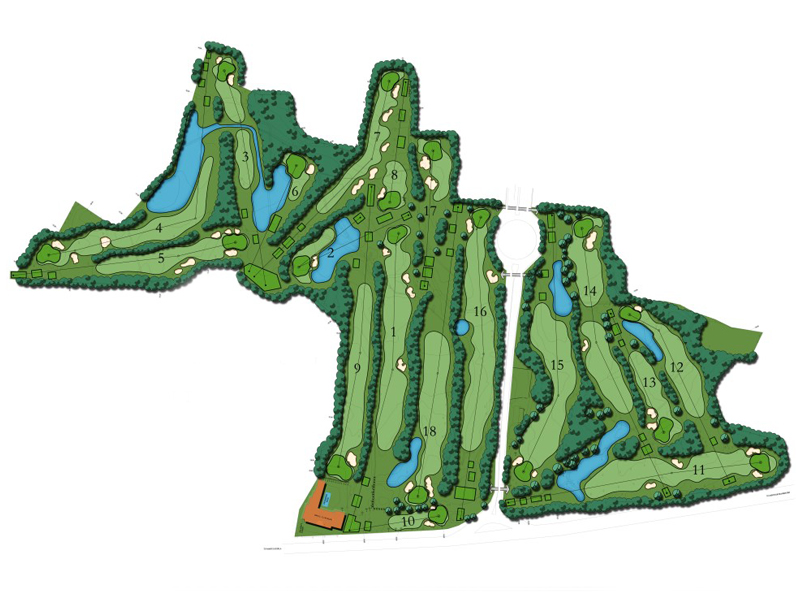
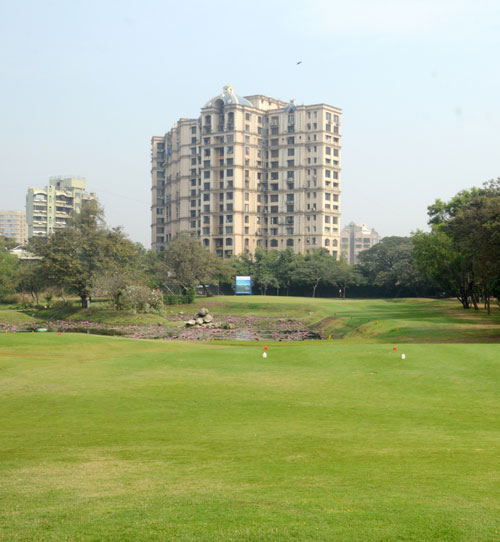
The BPGC is the most prestigious golf club in Mumbai & in 2009 underwent extensive redesign & modifications to the course. It’s a very demanding course & has a large member community that is largely focused on golf.
